As Microsoft announces next
version of SQL server that is ready to install on other plate forms then
Windows. SQL Server 2017 CTP 2.0 is supported on Red Hat Enterprise Linux, SUSE
Linux Enterprise Server, and Ubuntu. It is also available as a Docker image
which can run on Docker Engine on Linux or Docker for Windows/Mac. Question is
how to install Linux and SQL Server on it. I am going to show you step by step
guide to install both Linux and SQL Server vNext. I tried to cover all aspects
as much as possible in both command line and graphically.
SQL Server Latest Releases on Linux:
The next version of SQL Server
on Linux will include all the standard SQL Server management features that come
with the Windows version. These include advanced features like
always-encrypted, row-level security and columnstore indexes etc. You can get a
full list of features which are supported in this Microsoft link: SQL
Server on Linux Release Notes.
Download Ubuntu:
The first step is to decide
which platform is required to install SQL Server vNext. I decided to download
Ubuntu as I already have little bit of experience with it. You can download
latest version of Ubuntu form https://www.ubuntu.com/ . You will find a list of Ubuntu
files to download. I downloaded Ubuntu-17.04 server 64bit (Zesty Zapus) as
shown in pic (InstallUbunut-01)

Oracle VirtualBox
There are different ways to
install Ubuntu on your machine. For this exercise I decided to use Oracle
Virtual Box. VirtualBox is a powerful x86 and AMD64/Intel64 virtualization product
for enterprise as well as home use. Not only is VirtualBox an extremely feature
rich, high performance product for enterprise customers, it is also the only
professional solution that is freely available as Open Source Software under
the terms of the GNU General Public License (GPL) version 2. You can download Virtual
Box – Windows host from following link https://www.virtualbox.org/wiki/Downloads
Before starting Virtual box installation it is benificial to download some other required tools during ubuntu installation. You can work directly in ubuntu plateform but there is another way to work by connecting through PuTTY. You can work with PuTTY untill you have openssh on your ubuntu server. You can install openssh directly from ubuntu or by downloading it and install form given path. Following is the image that is showing ubuntu and other downloaded files.

There are different ways to
install linux. If you have Windows installed on your machine and want to
install linux seperately, you can go for dual boot installation. Dual-booting
is a technique which allows a single physical computer to run two or more
operating systems. This is useful for experimenting with new OS without touching
your existing setup. I have found a very good step by step installation guide
on following link http://www.instructables.com/id/How-to-Dual-boot-Linux-and-Windows-on-a-PC-with-W/
I choose virtual box to install ubuntu from my existing Windows. Next is step by step example for installing oracle virtual box.
1-
Double click on
the VirtualBox setup to start installation.

2-
This setup needs to
check free space on your hard drive.

3-
You will get
reset warning that you can read and press Yes.

4-
Setup will start
installing Virtual box and it will take few minutes only depending on your
machine performance.

5-
You need to
install Oracle Corporation Universal Serial Bus, press install

6-
Setup may ask for
some other network tools for installation
7-
You will get successful
installation message, press Finish to start Oracle Virtual box

8-
After finishing
setup Oracle VM Virtual Box Manager will open.

Create New VM using Oracle
Virtual Box
1-
To start creating
new VM setup, Press New icon from left top corner
2-
It will open new
VM setup screen where you have to set name for your VM as we are installing
Ubuntu for SQL Server so it will be “Ubuntu1710”

3-
Next is Type of
your operating system installation, for us it will be Linux

4-
We need to select
64-bit because we have downloaded same version

5-
You need to set
required RAM for the VM that will be part from total available system RAM. In
this case I have mentioned 4GB out of 6GB. You need at least 3.5 GB in order to
install SQL Server on Linux. If you do not have enough RAM, You can change it
even after creating VM.

6-
Continue by
pressing Next, You need to set Hard disk value. You can add it later or go for
virtual hard disk now, which I have selected.

7-
Next pop will be
used to select hard disk file type, I have selected Virtual Box disk image

8-
You have to
select which type of storage you will prefer, I used dynamically allocated so
that I can increase it when required.

9-
In this setup you
have to select storage file location and initial size of your VM. I have set 32
GB and will increase on demand.

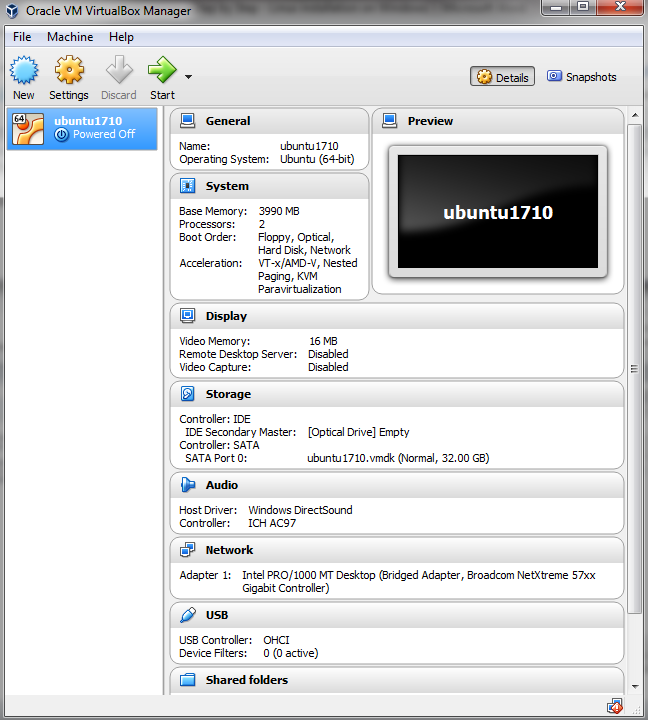
10-
Press “create”
and your new VM will be created. You can see detail on VM main page
11-
Given file
location name will be created windows folder.

You have successfully
completed virtual box and now need to start installing Ubuntu setup on it.
From this point on words Ubuntu installation will start. I will publish step by step detail in my next post... keep reading :)
No comments:
Post a Comment